Babilon
- About the Planner
- Create a New Planner in the Menu
- Prepare for Recording
- Get the Material Ready
- Planner Interface
- Build a New Plan
- Open the Planner
- Add Items to the Planner
- Create New Item
- Item Types List
- Item List
- Move Items Between Planners
- Edit the Planner
- Delete Items
- Save the Planner
- Add Content to an Item
- Add Text to an Item
- Format Text
- Add a Recording or an Audio File
- Record Sound/Audio
- Import Sound/Audio in an Item
- Drag/drop Audio in an Item
- Play Audio
- Edit Sound/Audio
- Synchronize Text and Sound
- Emphasized Text
- Add Images
- Import Images
- Link a video
- Delete Item content
- Save items Content
- Introduction Item
- Teach Item
- Example Item
- Simultaneous Item
- Verify Item
- Read and Record Item
- Ask Item
- Multiple Choice item
- Fill-in-the-Blank item
- Write/Dictation item
- Conversation item
- Disabled Item
- Item Properties
- Change Item Type
- Marks
- Item's Name
- Part Marks
- Match Case
- Randomized Answers - Multiple Choice
- Play Limit
- Match Case
- Item Options
- Timers
- Student Controls Locked
- Item View Time Counter
- No Limit View Time
- Sound Play Time View Limit
- Set View Limit
- Recording Time Limit
- Virtual Keyboards
- Select a Keyboard
- Create a Keyboard
- Save a Keyboard
- Optional Keyboard
- Deleting a Keyboard from a lesson
- Planner Options
- Slow Enable
- Legacy Window Size
- Item Selection
- Hide Lesson Menu
- Display Items in Sequence
- Display Items Randomly
- Back Button
- Feedback
- No Feedback
- Partial Feedback
- Full Feedback
- Users Preferences
- About the Tracker
- Access the Tracker
- Open the Tracker
- The Tracker's Interface
- The Header Bar
- List Users
- User Status
- Online Users
- Help Request
- Customized Student List
- List Students Alphabetically
- List Students Online
- List Students by Score
- List Students by Progress
- List Students by Class
- View by Class Procedure
- Activity Modes
- Change Lesson Mode
- Practice Mode
- Test Sequence
- Wait to start
- Start Test For All Students
- Start Test For Selected Student
- Start Test For Online Students
- Review Results
- Show Scores
- Final Mark
- Monitor the Students Progress
- Cells Colour Code
- Zoom in & out
- Answer Display Area
- Listen to Audio Responses
- Listen to Students' Recordings
- Listen to Sample / Instructors' Recordings
- View Students' Written Responses
- Self-Correcting Answers
- View Multiple-Choice Answers
- View Fill-In -the-Blanks Answers
- Leave a Message/Oral Feedback
- Procedure to Leave a Message
- Call a Student
- Broadcast to All Students
- Evaluate the Answers
- Marking tools
- How to Read the Mark Field
- Mark an Item
- Change a Mark
- Display Marks
- Display Marks Per Item
- Display Total and Subtotal Marks
- Add Mark Columns
- Cumulative Marks
- Mark Calculation Options
- Record Keeping
- Export Students' Oral Answers
- Export One Answer From One Student
- Export All oral Answers From One Student
- Export All oral Answers from All Students
- Export Evaluation Marks
- Export Marks Procedure
- Export Marks Format
- Export Scores Only
- Mark Out of Export format
- Mark Summary Export Format
- Include Legend in Export
- Print the Tracker
- Delete Student's Data
- Delete The Data of One User
- Delete Data From All Users
- Introduction
- System Tools Privileges
- System Attributes
- System Attributes Assignment Sample
- Define System Attributes
- Hide Menu with Attributes
- Manage Menus
- Add Items In Main Menu
- Create New Menu
- Edit Menu Items
- Move Menu Items
- View Menu Items Properties
- Copy Lessons/tests
- Link to an Existing Lesson
- Link to an Existing Menu
- Users & Groups Administration
- Class Functions
- Create Class
- Class Schedule
- Sample Schedule
- Edit/Modify Classes
- List System Classes
- Add Student to Class
- Remove Student from Class
- Delete Class
- User Registration Functions
- About Users
- Register an Instructor
- General Information Tab
- User Attributes Tab
- Instructor Settings tab
- Register a Student
- Student Settings tab
- Delete a User
- Change a User
- Display User List
- Save Display User List
- Detailed vs Summary Reports
- Create a Report
- Select a Report
- Report Options
- Detailed Report
- Summary Report
- Save Report
- About Importing Registration
- Import Overview
- Import File Format
- Sample Import File
- Import File - Lines and Fields Format
- Import Classes
- Import Instructors
- Import Students
- Delete Users Via Import
- Delete Classes Via Import File
- Refresh System
- Reresh Students
- Reresh Classes
- Import Procedure
- Reading the Import Log
- Babilon
- Add Babilon to Menu
- The Babilon interface
- The Instructor's Console
- The Babilon Options Menu
- Student WAIT List
- Babilon Groups
- The Student's Console
- Starting a Babilon Session
- Manual Placement in Group
- Manually Pre-set Groups
- Automatic Assignment To Groups
- Move Student to Different Group
- Remove student from Group
- Listen to a Discussion
- Join a Discussion
- Record a Babilon Discussion
- Settings for group recordings
- Stop Recording
- Listen to the recordings
- Deleting recordings
- CAN-8 Overview
- Using CAN-8. Getting Ready
- Installing CAN-8
- Starting CAN-8
- CAN-8 Login Screen
- Errors Signing in
- About User Roles
- System Supervisor Role
- Instructors' Role
- Students' Role
- Default Menu per ID
- Tools Available per ID
- About the Player
- Open the Player
- Player Interface Description
- Player's Menu vs Main Menu
- Player's Menu Icons
- Navigate the Player's Menu
- The Player's Work Area
- The Player's item Bar
- The Player's Text Area
- The Player's Graphics Area
- The Player's Sound Graph Area
- The Player's Button Bar
- The Player's Audio Controls
- The Player's Items' Description:
- The Introduction Item - Player View
- The Teach Item - Player View
- The Example Item - Player View
- The Simultaneous Item - Player View
- The Verify Item - Player View
- The Read and Record Item - Player View
- The Ask Item - Player View
- The Multiple-Choice Item - Player View
- Multiple-Choice - Full Feedback - Player
- Multiple-Choice - Partial Feedback - Player
- Multiple-Choice - No Feedback - Player
- The Fill in the Blanks Item - Player View
- The Writing or Dictation Item - Player View
- The Conversation Item- Player View
- the Player's Keyboards Options
- Character variants - Player
- The Player's Virtual Keyboards
- The Player's SV Phone
- The Player - Send Call request
- The Player - Receiving a Call
- The Player - Messages from Instructor
- The Player - Timers
- The Player - Preparation Timer
- The Player - Recording Timer
- The Player - Practice and Tests
- The Player - Practice Mode
- The Player - Pre-Test Mode:
- The Player - Test Mode
- The Player - Review mode
- The Player - Final Mark
I. Before you start
If you are not familiar with the Babilon interface or the options available, we strongly advise to read this section first. The information needed to set the groups is detailed here.
Adding Babilon in the Menu
Although the Babilon function is included in CAN-8, it does not by default appear in the menu. It must be added in the main menu in the area of your choice.
NOTES
If you want to prevent students from a class to be grouped with students from another class, create several Babilon entries in different parts of the menu. You can create as many Babilon entries as you need.
To add Babilon to the menu:
- Sign in with the Master ID
- Navigate to the student menu (make sure to create the Babilon entry in a part of the menu accessible to all students, or to the part of the menu your students can access.)
-
Right click where you want the Babilon entry to be placed and select NEW > ITEM ABOVE or ITEM BELOW.

-
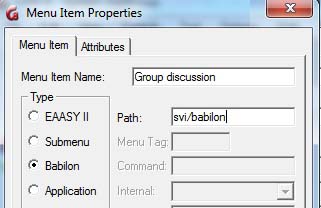
- In the in the TYPE section of the Menu properties window, select Babilon.
- In the TITLE field, type Babilon or Group discussion.
- In the PATH field, type in SVI/BABILON or leave this field empty and the system will generate a path for it.
- Select OK
- Save your menu.
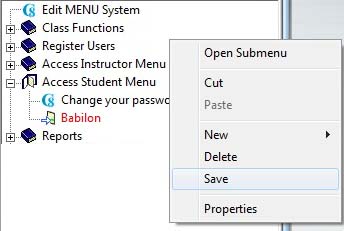
NOTES
To create another Babilon entry in the menu, repeat the steps above but make sure to assign it a different path (i.e.: SVI/BABILON2) at step 4.
The Babilon interface
Upon starting a Babilon session, the system will differentiate users signing with an Instructor ID from users signing in with a student ID. The interface presented, as well as the options available, will change according to the user privilege.
The Instructor's Console
Select Babilon in the main menu to open the Babilon console. There are 4 main sections to this console:
- In the top menu bar, the Babilon menu , which provides a list of available options.
- To the right of the interface, the waiting list. It lists the names of all the users who have entered this Babilon menu, their current status (active or inactive), and their privilege (instructor or student)
- In the center, the group area. Displays the groups (active or not) and lists the names of the users in these groups if any.
- At the bottom, the minimized groups' icons, active or not.
1. The Babilon Menu:
It is located in the top menu bar.
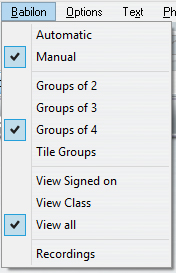
This menu includes the options available for Babilon, such as group size, manual or automatic assignment, and the display type of the wait list.
These options will be detailed in the sections they apply to.
2. The Student WAIT list:
The Wait list displays the name of students waiting to be assigned to a group. The window title bar caption is WAIT
By default, this list displays the names of all users (users currently online and users who have previously signed in Babilon)
The names in the waiting list are colour coded to indicate the users' status:
- If the student's name is highlighted in cyan, the student is currently connected and waiting to be placed in a group.
- If the student's name is on white background, the student has signed off Babilon. This user can still be assigned to a group and if so, will start automatically the discussion next time he connects to Babilon.
- Instructors' names are in red font.
- Red font on cyan background means the instructor is online, on white background means the instructor is offline.
- A name highlighted in grey indicates that it is selected (you have clicked on this name) and can be assigned to a group.
This list can be simplified to show only the names of the students belonging to a specific class, or to show the list of the students currently signed in.

- Babilon > View Signed On in the top menu reduces the list to the name of the users currently signed in this Babilon session.
- Babilon > View by class displays only the list of the students belonging to the class you specified, signed on or not.
You can reduce this list to an icon as illustrated below:
List displayed

List when minimized
To toggle between icon and list
- click on the icon to view the list
- Click on the X (exit button) to reduce the list to an icon
This icon is located at the bottom of the Babilon interface with the group icons.
3. The GROUPS:
Groups can have 2, 3 or 4 members. The sizes of the groups are set before you start assigning students to them.
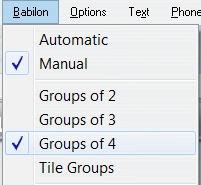
From the Babilon menu, select the number of participants per group. This setting is for all the groups. You cannot have a group of 2 and a group of 3 for example.
Each group is represented by a small window and labelled Group A, B, C,..., X
You can have simultaneously
- up to 24 groups of 2
- up to 16 groups of 3
- up to 12 groups of 3
The names of the students belonging to a group are listed in the group window. As for the waiting list, the students' names are colour coded.
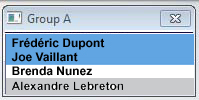
- names that are highlighted in blue are signed in the group and active (the discussion as started)
- names on white background are assigned to the group, but the students are not signed in Babilon.
- names highlighted in grey have been selected (you can select a name to place that user in a different group)
Groups can be either open and displayed , or closed and represented in the bottom left corner of the interface by icons, each icon representing a group.
To toggle between the group listing window and the icon:
- Click on the X (exit button) of the group window to reduce it to an icon.
- click on the icon to open the group window.
The icon will vary depending on the size of the group, and depending if they are empty (no users in that group) or if they include users
Groups of 2

There is a maximum of 24 groups of 2, each assigned a letter from A to X.
Groups of 3

There is a maximum of 16 groups of 3, each assigned a letter from A to P
Groups of 4

There is a maximum of 12 groups of 3, each assigned a letter from A to L
Icons are colour coded to indicate if they include users or not:
The icons are black and white if no-one has been assigned to that group. (the group is empty)

The icons are coloured or partially coloured when the group includes users (active or not):

Example
In this illustration 
- the icon representing group A is fully coloured. This indicates that there are 3 students in that group.
- The icon for group B only shows one coloured point: there is only one student in that group.
- And the icon for group C with 2 coloured points indicates that there are 2 students in that group.
NOTE:
Icons indicate how many members are in the group. They do not indicate if these members are active (signed in) or not. To see the students' status, you must restore the group to its original size and look at the background colour of their names.
The Students' Console
Users joining Babilon with a student ID have a simpler interface.
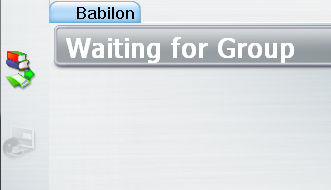
If they have not yet been assigned a group (if their name is showing in the instructor's waiting list instead of inside one of the groups), they will be presented with a Waiting for group message.
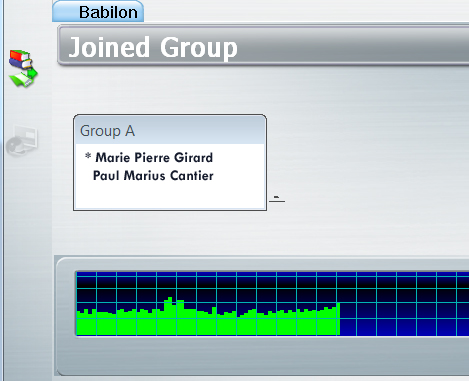
If the assignment was already pre-selected or the instructor set the group assignment on automatic, they will enter directly the discussion with their group. Otherwise, they will start as soon as the instructor select their name in the waiting list and place them in a group.
The names of the members in the group will be displayed.
The name preceded by a * character is the name of the user currently talking.
Students cannot see the other groups.
To leave the discussion, the student must exit the Babilon tab.
NOTES
If, during a Babilon session, the user opens a second tab in another CAN-8 lesson he/she will be disconnected from the Babilon discussion until the Babilon tab is selected again
II. Starting a Babilon Session
There are 3 methods to set a Babilon session.
- The first one consists in selecting manually the students one at a time as they log in and placing them in groups. Using this method, the instructor can choose who to pair the students with. This method requires the instructor be signed in Babilon at the same time than the students. The conversation starts as soon as the instructor assigns the students to groups.
- The second method consists in manually pre-selecting the students and assigning them in specific groups. As they log in, the students will start the conversation even if the instructor is not online. The students' names must be present in the waiting list in order to use this method.
- the last method consists in automating the students' placement. As they log in Babilon, students will be placed randomly in groups. The conversation will start right away.
In all cases listed above, the instructor can at any time change a student to another group or move a student from a group to the waiting list.
Method 1: Manual Placement
NOTES
Students and their instructor must be connected to Babilon at the same time.
- Click on the Babilon link in the students' menu.
- Verify that the group assignment is set to manual

- The group icons at the bottom of the screen will indicate the current group size. You can change the existing setting if desired.
- In the Wait list click once on the student name to select it (or use the up/down cursor keys)
- type the letter of the group the student should belong to. (A, B,..., X)
The name of the student will be moved from the waiting list to the group window and the discussion will start right away.
NOTES
While waiting to be assigned to a group, the students will see the following message

Method 2: Manually Pre-set Groups
You can pre-set groups manually before the students log in. The instructor will not have to be signed in at the same time than the students. As soon as the students sign in, the group conversations will start. This method, contrarily to the automatic assignment, allows the instructor to choose which students are grouped together.
To pre-set the groups, the students' names must be present in the waiting list, although not necessarily active.
The students' names will be shown in the waiting list if they have entered Babilon at least once. You will therefore not be able to use that method with students who have not previously signed in Babilon.
The steps are as follow:
- Click on the Babilon link in the students' menu.
- Verify that the group assignment is set to manual

- The group icons at the bottom of the screen will indicate the current group size. You can change the existing setting if desired.
- In the Wait list click once on the student name to select it (or use the up/down cursor keys)
- type the letter of the group the student should belong to. (A, B,..., X)
The name of the student will be moved from the waiting list to the group window.
NOTES
The discussion will start automatically the next time (and as soon as) the students enter Babilon.
Method 3: Automatic Assignment
When group assignment is set to Automatic, students are randomly assigned to groups as they sign in. There will be no waiting time as they enter Babilon. CAN-8 will make sure that no student is left alone in a group. If necessary, students are taken from their original group and assigned to a new group to provide company to a student who would otherwise be alone. As an example, if you have set the groups to be of 4, and only 5 students sign in, CAN-8 will place 3 students in group A, and 2 in group B.
- Click on the Babilon link in the students' menu.
- Set the group assignment to automatic

- The group icons at the bottom of the screen will indicate the current group size. You can change the existing setting if desired.
NOTES
This method does not require that the students' names be listed in the waiting list. The discussion will start as soon as the students select the Babilon link.
Move a Student from a Group to Another:
Independently of the mode of assignment selected (manual or automatic), the instructor can always move a student to a different group.
- Enter Babilon
- In the group list, click on the student name once (or use the up/down cursor keys)
- Once the name is highlighted, type the letter of the new group you wish to assign that student to.
The name of the student will be removed from the initial group list and shown in the new group list.
Remove Students from Groups
- Open the Babilon console
- Select the student's name in the group's window.
- On the keyboard, press the space bar.
The name of the student will move from the group list to the wait list and the student's interface will show wait to be assigned to a group
Listen to / Join a Discussion
Instructors have the options to listen to a group discussion, or to join a discussion.
Listening to a discussion
The instructor can listen to any group discussion at any time. When in Listening mode, the instructor cannot talk to the group members, and the members are not aware the instructor is listening.
To listen to a group, click on the icon on the left of the group header bar and select Listen.
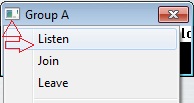
To stop listening to a group, click on the icon on the left of the group header bar and select Leave.
Joining a Discussion
The instructor may join and participate to a discussion with any group, at any time.
When joining a group, the name of the instructor is shown with the names of the other group members.
To join a group, click on the icon on the left of the group header bar and select Join.
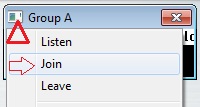
To leave the group, click on the icon on the left of the group header bar and select Leave.
III. Recording a Discussion
To record a discussion, there must be at least 2 active students in a group. Active students are students who are currently in that Babilon session, and placed in a group. If there is only one student present in the group, the recording will not start.
Recordings can be set while students are active in Babilon, or preset for the next time students log in.
Step 1: Set the Recording Length.
- open the Babilon console
- In the Babilon menu, select Recordings

-
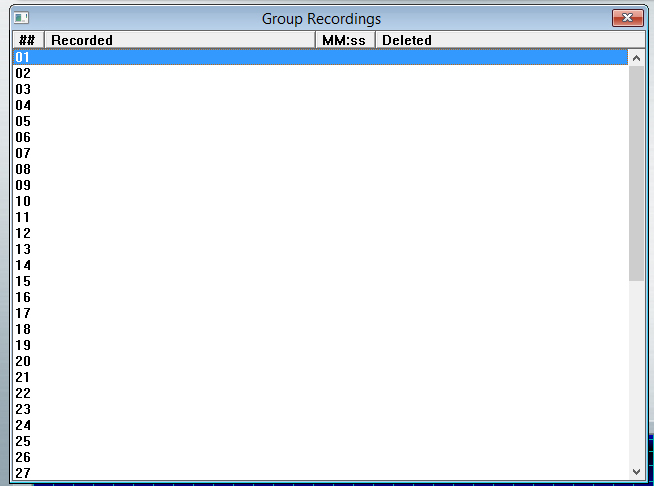
The Group Recordings list will show.
- Double click on an empty line. (previous recordings may be listed in that window.)
-
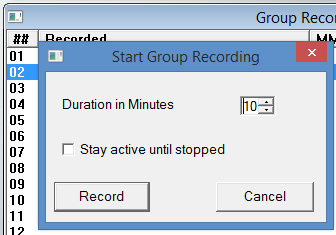
In the start group recording window,
- Set the desired length of the recording in the Duration in minutes field.
The minimum length is one minute, the maximum length is 40 minutes. The recording will stop once the time limit is reached.
OR
- select Stay active until stopped. It will override the time setting. The instructor will have to sign in to stop the recording manually.
- Press Record
NOTES
- If the students are signed in and already in a group, the recording will start right away.

- All active groups will be recorded at the same time.
- If the students have been placed in a group, but are not currently signed in Babilon, the recording will start as soon as they sign in.gs in.
- For unsupervised preset and automatic groups recordings, be aware that the recording timer starts when the first student logs in Babilon, and that no recording will show until at least a second student logs in that group. This means that if the recordings are set to last 10 minutes, but the second student only logs in after 9 minutes and 30 seconds, the recording will only be 30 seconds long.
Step 2: Stop a Recording
You can stop a recording at any time, even if it has been preset for a certain time length.
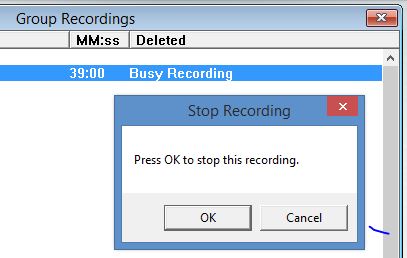
Click anywhere on the line listing the recording you want to stop (it should say Busy Recording). At the stop recording prompt, select OK
Step 3: Listen to the Recordings.
NOTES
You can only listen to the recordings once it is stopped.
To listen:

- select Babilon > Recordings in the main top menu

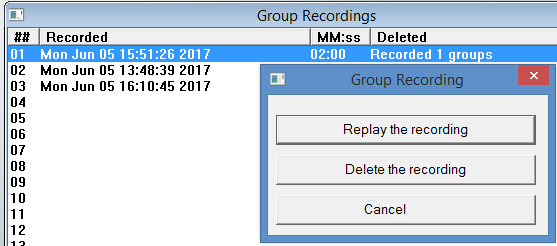
- Double click on the recording you wish to listen to
- At the prompt, select the option Replay the recording.
- The next interface is divided in 2 areas:
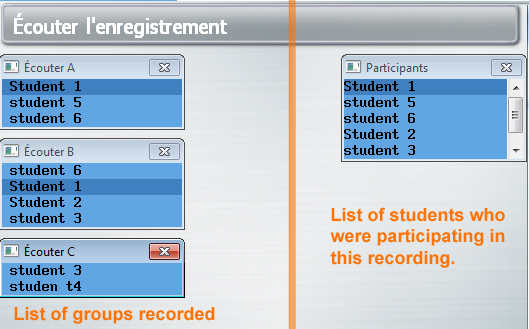
- To the right is the list of Participants. It lists the names of all the students who were participating to a discussion at the time of the recordings.
- To the left are the groups that were recorded (Replay lists). Each group has one recording.
NOTES
...We mentioned earlier that when Babilon is set to automatic mode, a student may be moved from a group to another one to balance the number of users per group. If the student was moved while the groups were being recorded, this student will show in several group recordings; when you highlight (click on) the name of a student in the Participants list, it will highlight that same student's name in all the Replay lists this student was recorded in:
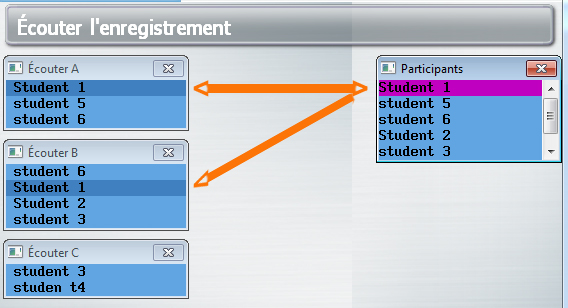
- To the right is the list of Participants. It lists the names of all the students who were participating to a discussion at the time of the recordings.
- To select group recording, click on the group header. The audio graph will display the rendering of the entire discussion.
-
Selecting a student's name in the Replay list will highlight this student's recording in magenta in the volume graph. This will give you a visual clue of the participation level of each student.
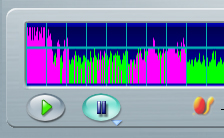
- To listen to the conversation, press the Play button on the volume graph, or simply click on the audio rendering of the conversation in the volume graph.
- To exit this replay window, select Babilon > recordings in the main menu.
Step 4: Deleting Recordings.
To delete a recording:

- select Babilon > Recordings in the main top menu


- Double click on the recording you wish to delete
- At the prompt, select the option Delete the Recording.