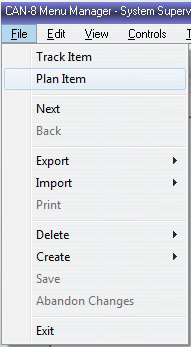
Locate and double click on the CAN-8 icon on the desktop.
 The login screen may display 2 or 3 fields, depending on the software installation settings.
This Chapter is meant for instructors who are new to the CAN-8 system or newly acquainted with this version.
After reading this chapter, instructors should be
This chapter covers CAN-8 main interface and the Player. Authoring, monitoring and administrative tools are addressed in other chapters.
The Player's section of this chapter details the lessons as they are presented to the students. It is therefore strongly recommended for anyone designing CAN-8 lessons or assisting students in a lab environment to read this chapter before proceeding with the others.
The process of signing on is the same for all users, and requires that they know their identification code and secret password.
![]()
Locate and double click on the CAN-8 icon on the desktop.
The login screen may display 2 or 3 fields, depending on the software installation settings.
Note:
 Use the Tab key or the mouse to move the cursor from one field to the other.
Use the Backspace key to correct typing errors.
Use the Enter key or click on the login icon
Use the Tab key or the mouse to move the cursor from one field to the other.
Use the Backspace key to correct typing errors.
Use the Enter key or click on the login icon  to sign in. If the password does not correspond to the user ID entered, the message Your ID or Password is not correct will appear. Check for spelling mistakes in the User ID and then re-type the password.
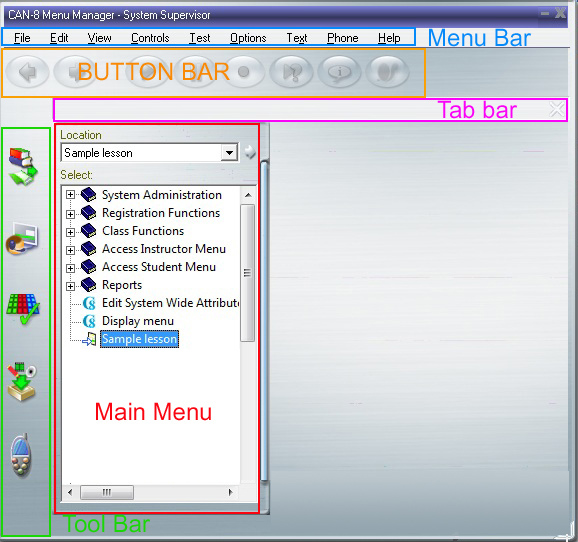
Once successfully logged in, the user is presented with the main interface.
Note:
All function bars remain visible at all time, allowing the user to access several functions simultaneously without having to exit the screen they are in.
Users profiles may be customized with a background image. This image will replace the default background of the main interface.
The Main menu may be covered or hidden by other menus (opened lesson or planner menus for example). It can however always be retrieved at any time by clicking on the Menu button in the Tool Bar.
When the Menu button is pressed, the menu slides in or out and the default interface is restored.
Users registered as student see a simplified version of the tool bar since they do not have access to the same functions.
This bar is identical for the user signed in as the system supervisor and for the instructors. Students have a simplified menu bar.

Most of the options available in CAN-8 are present in the menu bar.
When placing the mouse cursor over the menu bar, contextual menus open with options.
If a function is not available for the active interface, the option is greyed out. Therefore options related to the Tracker are greyed out when the active interface is the Planner and vice versa.
When first signed in, most options are greyed out until an entry is selected in the main menu. In the illustration, the user has selected a lesson in the main menu. Both the Planner and the Tracker options are active. Had the user selected a menu or an application instead, these options would have been greyed out.

When in the main interface, these buttons are present but are all greyed out. They will only be activated when a lesson is selected.
These buttons are further detailed in the Buttons and Controls section of the Player.
When first signing in, the Tab bar is empty.
Tabs appear when a lesson is opened with the Player, the Planner or the Tracker.
The maximum number of tabs that can be simultaneously opened varies from 1 to 7; This number is set on a per user basis, in the user's profile. Which means that while some users may have 7 maximum tabs allowed, others may only be allowed to open 1 only, or any number to the maximum of 7.
A Tab in the tab bar means that the lesson is opened; it does not mean the lesson is displayed on the screen. For example, several lessons can be concurrently opened, but only one can be displayed at a time. Tabs are used to switch from one lesson to another, or one function of the lesson to another without having to exit the previous one. This allows an instructor to monitor several classes simultaneously, or edit a Planner and view the changes in the Player.
A tab conveys three types of information:

 Player, a
  Planner or a
  Tracker.
To exit any of the tabs,
 Select the exit icon at the extreme right of the tab bar.
 These steps have to be repeated for each tab.
The icons in the Tool Bar are shortcuts to the main functions of CAN-8. They are linked to:
The chart below details each button available in the tool bar, their possible state and their function.
| Active state | Mouse over State | Greyed state | Function |
 |
|
N/A | Shows or hides the main menu from any interface currently opened. This allows the user to open more than one Planner, Tracker or lesson at a time. This button is always in active mode. |
 |
 |
Clicking on this button opens the Player of the lesson selected. If the menu selected is an application or a submenu, this button is greyed out. It is only active when a lesson is selected in the main menu. |
|
 |
 |
Select a lesson in the main menu and then select this button to access the lesson's Tracker If the menu entry selected is a lesson, this button is shown as active. If the menu selected is an application or a submenu, this button is greyed out. |
|
 |
 |
Select this button to access a lesson's Planner. If a selected menu entry is a lesson, this button is shown as active. If the menu entry selected is an application or a submenu, this button is greyed out. |
|
 |
N/A | Pressing this button will bring the SV phone interface. The instructor can then either call an online student or broadcast to all online users. |
Displays the list of lessons and accessible system functions in the form of a treeview.
This menu can be retrieved at any time and from any CAN-8 interface (Player, Planner and Tracker) by clicking on its icon in the tool bar.
The menu presents a list of choices to the user. These choices can lead to different system functions like internal administrative functions, lessons, medias or internet links. The icon identifies the type of the link:
Each user, when registered, is set to start in a specific menu.
Students access the Student Default Menu and instructors access the Instructor Default Menu.
Yet the system can be customized to the needs of each user. For instance, students taking English could start in a menu that leads exclusively to pronunciation and vocabulary exercises in English while students taking French could begin in a menu that leads to French pronunciation and vocabulary lessons only.
There may also be a need for an instructor's ID used exclusively to register students. That ID can be customized so that only access to the registration functions tool is visible when signing in.
For information on how to customize a users main menu, please refer to the Managing menus section of this manual.
When the user selects a choice and presses the Enter key, (or double-clicks on the choice with the mouse) the appropriate lesson or function is started.
You may use the mouse to navigate through the menus in the following way:
In some cases, you may wish to only select an item for the purposes of editing it, but not begin using it.
You may also use the keyboard to navigate the menus.
The following keys are active in the menu:
| Cursor Down | Moves the selection down one line in the menu. |
| Cursor Up | Moves the selection up one line in the menu. |
| Pg Down | Moves the menu down by one screenful if there are lines to display. |
| Pg Up | Moves the menu up by one screenful if there are lines to display. |
| Home | Moves the selection to the first item in the menu. |
| End | Moves the selection to the last item in the menu. |
| Right Arrow Key | Displays the content of a menu |
| Left Arrow Key | Hides the content of a menu |
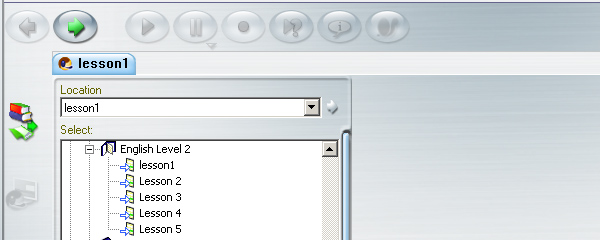
To access the Player:
Once the lesson selected (highlighted dark blue), click on the Player button or click on the lesson title a second time. Place your mouse over the image below to toggle between the same interface with and without the Lesson 1 Player opened:

Note:
When the Player is opened, the Tool, Menu and Button bars are still visible.
The main menu is replaced by the lesson's menu.
When the Player is exited, the user is presented with the default interface and the main menu.
An instructor may however choose to also access a Tracker, and/or a Planner, from a different lesson and must therefore go back to the main interface to select another lesson.
 Select the menu icon to access the main interface. The main interface is displayed.
 Although the Player is no longer visible, it is still active and can be accessed by clicking on the Lesson tab. It will open exactly where it was last left.
Depending on the instructor's settings at registration, up to 7 such tabs can be concurrently opened. The instructor can toggle from one Player to another, or to a Planner/Tracker, by selecting the corresponding tab.
The Player is divided in 3 sections:
As mentioned in the proceeding chapter, there are two types of menus to consider:
In a lesson's default practice mode, the menu is present throughout the entire lesson. Students can chose the item they want to display by clicking on it.
The lesson can however be set in sequence or random mode in which case the menu is not displayed. The work area is then stretched over the menu area and the user selects the Next button to view the next item in queue. Click here to view a lesson sample with and without the menu displayed.
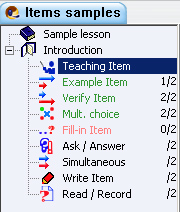
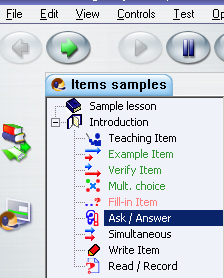
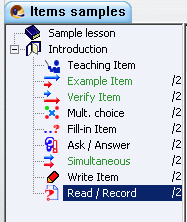
The type of the menu displayed (main menu or lesson menu) can easily be differentiated by the icons associated to the menu entries. In a lesson menu, each icon represents an exercise type. These icons are never present in the main menu.
|
Each item type presents a different interface and requires different input from the student. For more detailed information regarding each type, click on the corresponding type name in the table. |
The navigation through the Player's menu is done using
Note:
Navigation with arrow keys is not possible in the lesson menu.
After each item is completed, the student is expected to go to the next item, using one of these 3 methods unless the lesson is set with timers, in which case the next item will automatically appear.
If the Player does not show a lesson menu (the lesson was specifically set to Sequence or random to prevent the user to chose the exercise's order), the user can only progress through the lesson using either one of the 2 Next buttons, or the F8 function key.
The work area is where the content of the lesson's exercises is displayed, including text, images, audio, depending on the item type. It is also divided in 4 main areas as underlined in the illustration below:
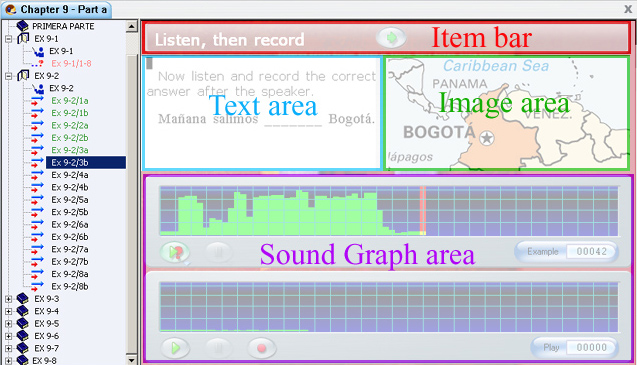
Located at the upper part of the work area.
It provides generic information to the student such as:
Any additional text the instructor wanted to add to the item is displayed in this area. It may include item specific instructions and/or a text for the student to read
If the item does not include any graphic, this area expands to cover the full work area.
Equally, if the lesson's menu is hidden, the text area will also expand over the menu area.
Text that is part of an exercise cannot be copied or exported from the Player.
This is where an image or the graphic part of a video, if any is included in the exercise, is displayed. In items that require 2 volume graphs and text like Example item, this image may be truncated to allow room to display all content.
Depending on the type of item displayed, this area may include one, two, or no sound graph at all.

The volume display is a graphical display of the sound volume over time.
The height of the green bars in the graph represents the loudness of the sounds
in the recording. Typically words or sentences will appear as louder sounds
in the display. This provides an easy visual way to find the starting points
of sounds. The student can select a particular location to play from by
clicking the mouse on the volume display. The system will play the sound from that point.
Alternatively, the student can press the Play button, in which case the sound starts playing from the beginning of the recording.
The audio controls used to record and play audio are present on the sound graph.
 They are identical to and have the same functions than the controls present in the button bar, but for the Speed Control slider.
This slider allows the student to slow or speed the audio at will without changing the pitch of the sound.
 To slow down the sound, slide the slider thumb to the left.
 To speed up the sound, slide the slider thumb to the right.
 To go back to the normal speed, slide the slider thumb to the center, where it is pre-marked.
Note that if you click on the icons at either side of the slider, the slider thumb will move incrementally towwards that icon.
The instructor can disable this function. (see Planner options in the Authoring section)
In an item where 2 sounds graphs are present, the top graph represents the instructor's voice sample; the lower graph is a graphical representation of the student's recording. The user may click on either one of these graphs to alternate both recordings.
In items where Written input is required, only one sound graph is displayed, the instructor's sample graph.
Other items will only show the student's sound graph.
Although the button bar is truly part of the CAN-8 main interface, its functions are only activated when a Player is opened. These functions will therefore be discussed in this section of the manual.

Using the keyboard and the mouse, the student can:
A number of on-screen buttons, menu options and controls are linked to functions that can
be used by the student in a lesson. The on-screen buttons are each associated with
a function key. Pressing the function key
or clicking on the screen button with the mouse "presses" the button.
The functions associated are the following:
| Button | Keyboard shortcut | Menubar access | Function | |
|---|---|---|---|---|
 * * |
F2 | Controls > Play > Yourself | This button plays the recording the student had made in the item from the beginning. | |
 * * |
F3 | Controls > Record > New Recording or Continue Recording. | This button starts recording the student's voice. Any previous recording is replaced by the new recording. However, when accessing this function from the menubar, the student has the choice to redo the recording, or continue a recording. | |
 * * |
F4 | Controls > Pause | Pressing this button in the middle of playing or recording suspends the play or record. Pressing the button again resumes. | |
| The buttons above marked with an * are also present on the sound graph and have the same functions | ||||
 |
F5 | Controls > Play > Example | Pressing this button plays the sound recorded for the item in the lesson. In example items this plays the example sound that the student is to emulate. | |
 |
F6 | Controls > Play > Introduction | This button plays the sound recorded for the instructions that apply to a section of a lesson (1st "I item" before the exercise). If special instructions have been given to the student for an item (in a "C item" for example) these are played instead. | |
 |
F7 | N/A | Pressing this button causes all recordings to be played slower. The sounds do not change in pitch. Pressing the button again returns to normal speed playback. | |
 |
F8 | File > Next | Pressing this button terminates an item and displays the item menu. When the item menu is already displayed, this button selects the next item in sequence. | |
 |
N/A | File > Back | Pressing this button terminates an item and displays the preceding completed item. | |
 |
F9 | File > Exit will log the user off CAN-8, even if the student is in a lesson at that time. It cannot be used to exit a lesson or an item only. To exit a lesson or an item, the exit button in the tab bar should be used instead | This button is present on the top right corner of the interface drag bar. It will quit the software even if a recording is being made at that time. | |
|
This button is at the extreme right side of the tab bar. This ends the student's session in this lesson. Control returns to the course menu selection system or another tab if one is available. | |||
Each one of the buttons described above have 5 possible states, depending on the functions available in the item, of the rights given to the student to access them. The table below represents each state for one button only, as they are similar for each button:
| Button | Status | Description | |
|---|---|---|---|
|
Normal | Indicates the function is available and and can be started by clicking on the button. | |
 |
Hot | Indicates the mouse is over the button | |
 |
Pressed | The button remains in this state while its function is running. It will return to its normal state as soon as it's done, the pause button is pressed or the next item is presented. | |
 |
Greyed | If a button function is not available for a certain screen, it will be displayed greyed out. | |
 |
Pressed & Greyed | Indicates that this function is currently running, but the control of this button is not available. This is usually encountered in an item with a timer and where students' controls have been locked. | |
 |
If the mouse cursor is held over the button for a few seconds, a tooltip showing the function of that button will appear below the button. | ||
The following description and visual renditions of the different items apply to items placed in the default Practice mode without timer.
The behaviour of each of these items may differ when the lesson is placed in test or review modes.


May include: audio or graphic
Does not present an interface to the student.
Users cannot input any data
Introduction items are represented in the menu as open or closed folders, depending if they are expanded or not. They can be used to divide the lesson into logical sections.
Depending on the content the instructor has included while creating it, the Introduction item will behave differently:

May include: audio, text, graphic or video
Requires no recordable input from students
The teaching item explains a concept or advises the students of the nature of the exercises that will follow and the task expected.

The sound is played
automatically when the student enters the screen.
As the sound plays, some text might appear highlighted in cyan. This text has been synchronized to a part of the audio; the student can mouse click on the blue synchronized words in the text and
the sound corresponding to the text will be played as many times as necessary.
The controls available to the students in a Teach item are Play, Pause, slow play, and the Next button. All other controls (like Record or Type) have been disabled.

May include: audio, text, graphic or video
Requires student to: Record a verbal answer
The following screen is an Example screen.
Two volume displays show the instructor's voice at the top and the
student's own recorded voice below.
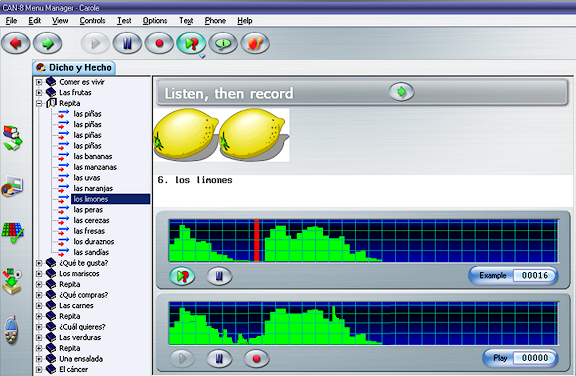
This screen allows the students to listen to the instructor's voice
and then repeat and record what the instructor has said. The students
can then compare their own recording with the instructor's.
In the common case where the lesson is set without timers, the student may record as many times as desired. Each time the Record button
is pressed, the previous recording is replaced with the new one.
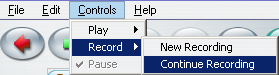
To add to an existing recording,
the student can select Controls > Record > Continue Recording in the menu bar.
The student can also play either the instructor's or the student's own voice
by mouse clicking directly on either volume display.
The work area can also contain text that may
be synchronized to the sound. As the instructor's voice is played,
the synchronized words in turn are highlighted in cyan. The student can mouse
click on a synchronized word as many time as necessary to hear the recording at that word.
When the student has achieved a satisfactory recording, pressing
Next will display the next item.

May include: audio, text, graphic, video
Requires student to: Record a verbal answer
This item appears the same on the screen as the Example item
and incorporates the same components.
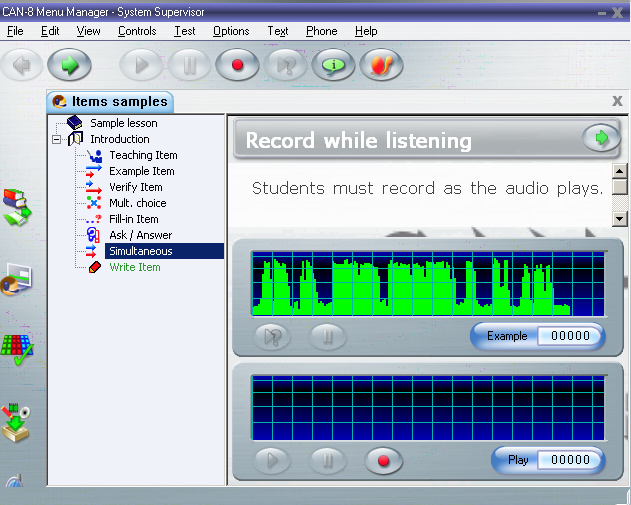
However, in the Simultaneous item, as students press the record button, both the recording and the instructor's recorded audio start at the same time. This type of item requires a simultaneous recording and the students must listen to the
recorded example while their own recording is done.
If the student presses Pause during a recording, both the sample recording and
the student's recording, can be played separately.
The student's recording is saved when the student selects Next.
This item type is typically used in simultaneous translation
exercises.

May include: text, graphic, video
Requires student to: Record a verbal answer
This item is similar in appearance to the Example item
but it is designed to have the students first record their own answer to a question before listening to the correct answer pre-recorded by the instructor.
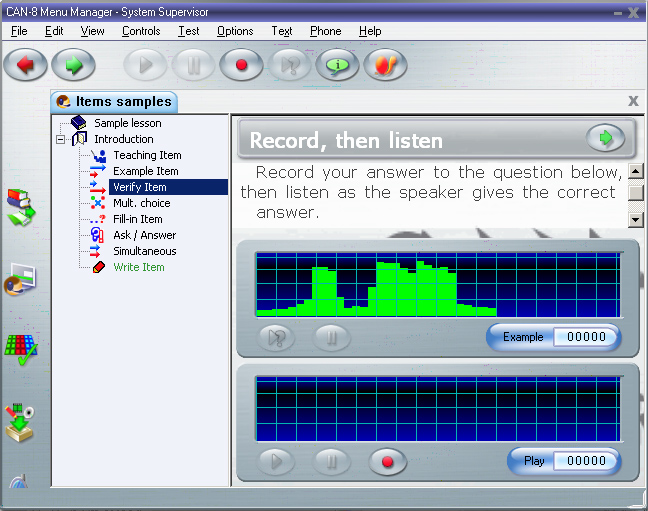
In the common case where the lesson is set without timer, the student may record as many times as desired. Each time the Record button
is pressed, the previous recording is replaced with the new one.
To add to a recording,
the student can select Controls > Record > Continue Recording in the menu bar.
After the student has recorded an answer, both the sample answer and
the student recording can be played. The student can then change the answer to match the instructor's answer if necessary.
The student's recording is stored when the student selects Next.

May include: text, graphic, video
Requires student to: Record a verbal answer
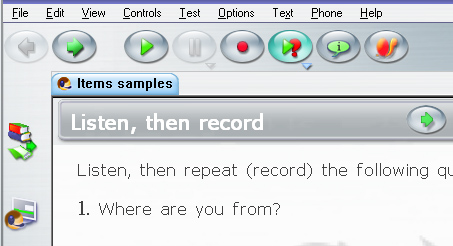
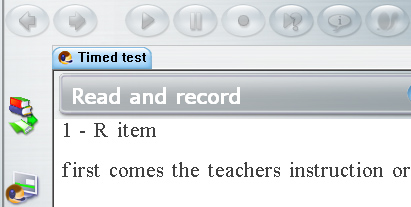
The screen below is a Read and
record item. Usually used if the instructor wants to test for the student's ability
to pronounce words without the aid of an example to listen to, or for questions that require a personal answer from each student. There is no recorded sound from the instructor in these items but text instead.
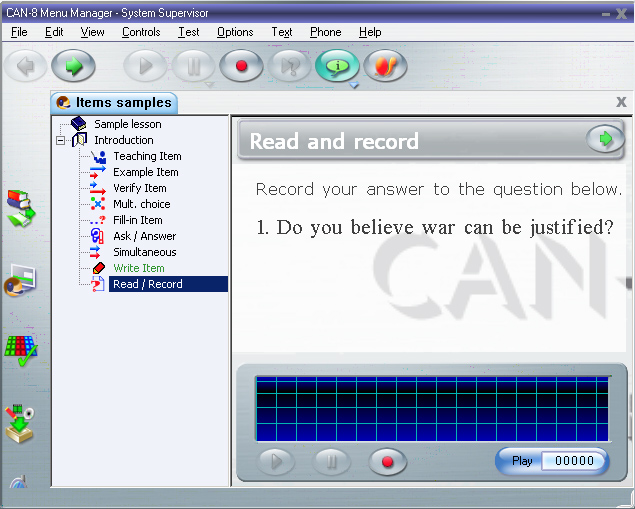
Graphics may be present.
The student is expected to record a response to the instructions given in the text of the item.
If the item does not include a timer, the student may record as many times as desired. Each time the Record button
is pressed, the previous recording is replaced with the new one.
To add to a recording,
the student can select Controls > Record > Continue Recording in the menu bar.
The student's recording can be listened to
as often as desired using the play button or clicking on the volume graph.
When the student has achieved a satisfactory recording, pressing
Next makes the recording available to the instructor and calls
up the lesson menu or the next item.

May include: audio, text, graphic, video
Requires student to: Record a verbal answer
The screen below is an Ask item. The ask item includes a verbal
question and requires the student to record the response. The instructor might have added some text or
graphic as well.
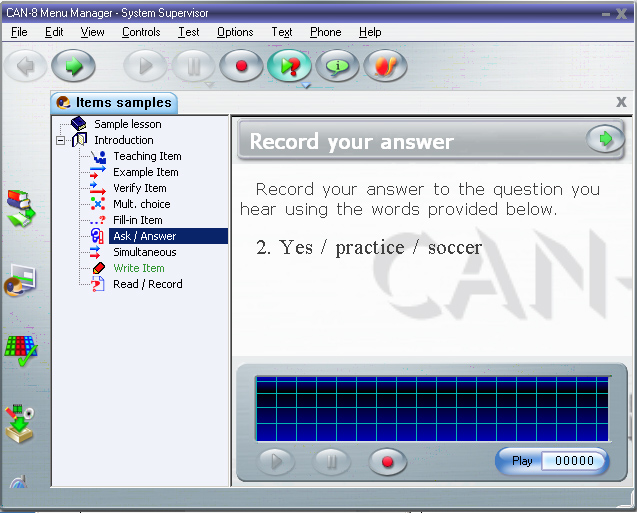
There is no volume display of the instructor's voice for the student. The instructor's question can be re-played using the Example button.
If the item does not include a timer, the student may record as many times as desired. Each time the Record button
is pressed, the previous recording is replaced with the new one.
To add to a recording,
the student can select Controls > Record > Continue Recording in the menu bar.
The student's recording can be listened to
as often as desired using the play button or clicking on the volume graph.
Students can see their own voice displayed on the volume graph and can replay
and re-record as desired.
This item tests a student's ability to understand a spoken question
and to prepare a response without the aid of a recorded example.
When the student has achieved a satisfactory recording, pressing
Next makes the recording available to the instructor and proceeds to
the next item.

May include: audio text, graphic, video
Requires student to: Select an answer
The screen below is a Multiple
choice question.
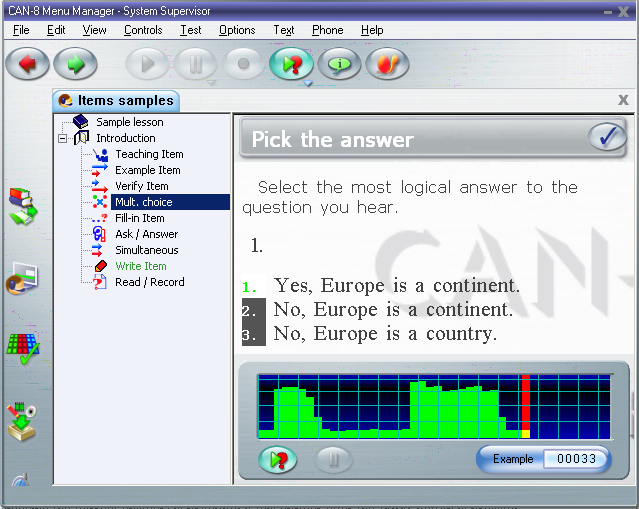
The sound is played
when the item is entered. The volume display shows the sound that was recorded
for the item by the instructor.
The sound can be replayed with the Example button or by clicking
on the volume display.
The student is required to Pick the answer (1 - 8). Each of the
possible answers is numbered. An answer may be selected by entering
the number of the answer with one of the keyboard's numeric key or by clicking on the answer line.
Once the choice made, the students proceed to the next item by either selecting the NEXT icon in the menu bar, or the CHECK icon in the item bar:

Note:
The CHECK button only appears if the student answers the question.
Before the question is answered, or if the student is just browsing through the item but does not select an answer, a NEXT icon is presented instead:

 If the lesson has been configured so that full feedback is provided, the feedback will appear when the Next or Check button is pressed.
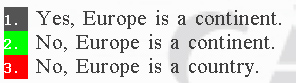 The answer that was selected (incorrect answer) is displayed on red background whereas the
correct one is displayed on green background.
The answer that was selected (incorrect answer) is displayed on red background whereas the
correct one is displayed on green background.
 Partial feedback will only display the status of the answer (correct or incorrect) in the item bar, but will not show the correct answer.
When the instructor sets a lesson in test mode, the feedback is usually removed. The next button is active in the item bar, but no information regarding the correctness of the answer is given.
The student must press the Next button to proceed to the next item.

May include: audio text, graphic, video
Requires student to: Write an answer in the blanks provided.
The screen below is a Fill
in the blanks question.
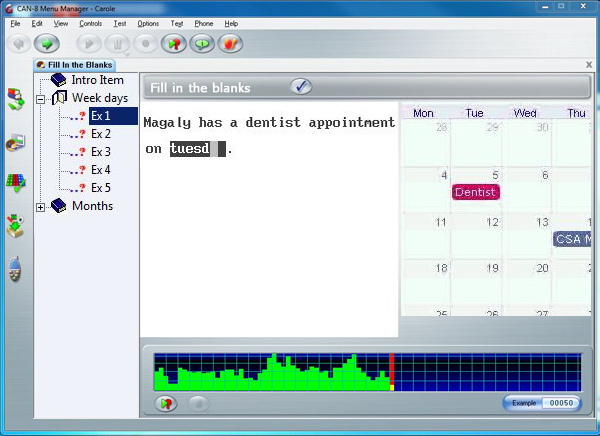
This item may contain graphics as well as sound. The sound is played
when the item is presented and can be replayed by pressing the Example
button or by clicking on the sound display.
The student is required to type in the correct word or words in the
blank space(s) on the screen. There can be more than one blank space per screen. Blank spaces are displayed as boxes with a dark background (as in the image above) or with a white background (depending on the users settings). The text cursor blinks in the box where the next answer should start.
The student uses the keyboard to type in the answer(s). In some lessons, a Virtual Keyboard might come up when an item requiring text input is entered.
When one area (or blank space)
is filled in, the cursor will automatically move to the next input area of the screen.
The student can use the backspace key to move back to re-type
a letter to fix an error. The tab key can be used to move forward to the next blank space.
Letters cannot be deleted; they must be typed over.
The mouse can be used to position the text cursor by clicking
on the new location.
Pressing the Next or Check button makes the answer available to the
instructor and advances to the next lesson item. If feedback (which may include
displaying the correct answer) is provided it will appear after the
Check button is pressed.
Feedback appears in the item bar, informing the student that the answer selected is correct or incorrect
If the lesson has been configured so that full feedback is provided, the feedback will appear when the Next or Check button is pressed.
The correct answer(s) are shown in a green field under the incorrect or missing answers, as shown below:

Note:
In the above example, there are 2 blanks, 1 of which was answered incorrectly.
The feedback is only shown under incorrect answers.
Partial feedback will only display the status of the answer (correct or incorrect) in the item bar, but will not show the correct answer.
When the instructor sets a lesson in test mode, the feedback is usually removed. The next button is active in the item bar, but no information regarding the correctness of the answer is given. The student must press the Next button to proceed to the next item.

May include: audio, graphic, video
Requires student to: Type a written answer
The screen below is a Writing or Dictation item. This item is, much like the Record item as was seen above, only the student's response is written rather then verbal:
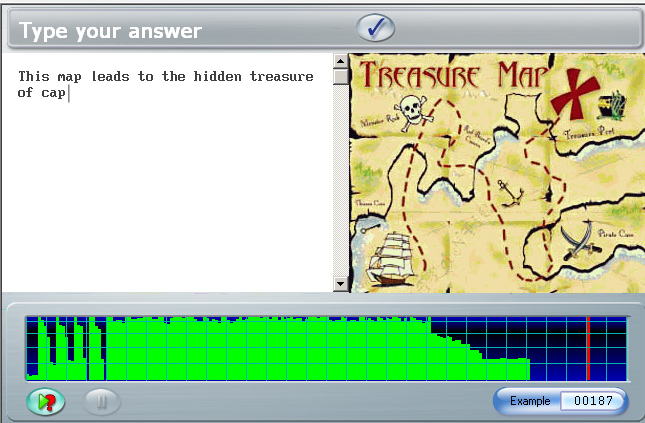
The student is given either an verbal instruction or a dictation to transcribe. An image may also be presented.
In some lessons, a Virtual Keyboard might come up when an item requiring text input is entered.
No feedback is given by the system to a write item.
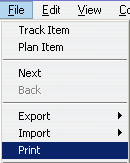
The student may print a copy of the text they have created, or save it to file, by selecting the Print or Export option from the file menu.
The student must press the Next button to proceed to the next item.
The conversation item is not visible in the lesson's menu, nor from the Player as it does not have an interface.
This item can only be paired with and Example or a Verify item and provides only an additional voice input to the item that follows.
Only the item it is paired with shows in the menu.
If for example the lesson was created with a Conversation item named C ITEM followed by a Verify item titled V ITEM, the Player will only display the icon and the title for V ITEM.
As the student selects V ITEM in the menu, the Player displays the interface for V ITEM, however the first audio that is played is the audio included in C ITEM.
More details on Conversation items can be found in the Planner section.
In items that require typed input,
students may just use the regular keys on the keyboard.
In some lessons however, the text required might include characters that are not on the keyboard.
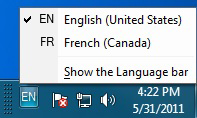
If the settings of the workstations allow for more than one language in the input locales, then switching languages in the bottom right corner of the screen will allow to type in another language using the same keyboard.
However, in many cases, the answer must be composed in a language that does not have standard keys available on the keyboard for doing so.
The following two options can be used to enter character variants:
Certain languages for example may require that some characters be accented.
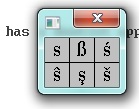 In cases where only a few variations of the keyboard’s characters are required, by right clicking on the typed character the student will be presented with a pop-up box of available accents or variants for that character that may be selected by clicking on the appropriate one.
Alternatively the student may select accented characters by first typing the character without the accent and then pressing the CTRL and A keys. By repeatedly pressing CTRL A, the student can cycle through all the possible accents or variants for that character.
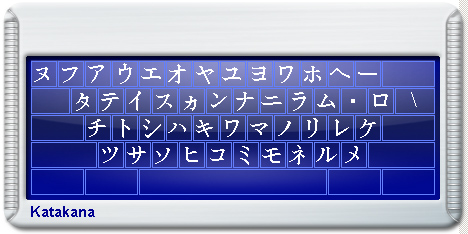
Sometimes the instructor will decide to include a virtual keyboard in the lesson, either because of its specific layout or because the characters required to answer the question are too different from the computer’s keyboard characters.
If such is the case, when entering an item that requires typed input, like Fill in the Blank items or Write and Dictation items, the student will be presented with an on-screen keyboard:
If the keyboard has been designated as optional by the instructor in the planner, the students can toggle between the system’s keyboard and the on-screen keyboard and select characters from either one.
Clicking on either the virtual keyboard or on the typing area will select one of the keyboards.
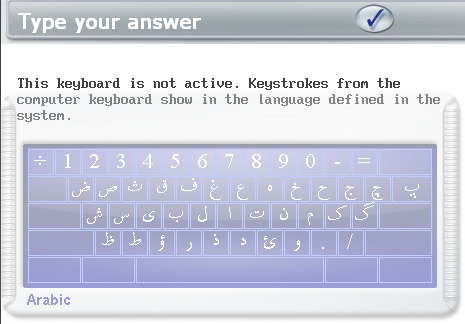
In cases where the defined (on-screen) keyboard is non-optional, when the lesson is opened and the keyboard appears on the screen, any character typed with the computer's keyboard will come out as the corresponding character displayed on the on-screen keyboard. The student may also directly click on each key of the on-screen keyboard to enter the character.
Combinations of the Shift, Alt, and Ctrl keys can be used to select from up to eight different levels of layout in one keyboard.
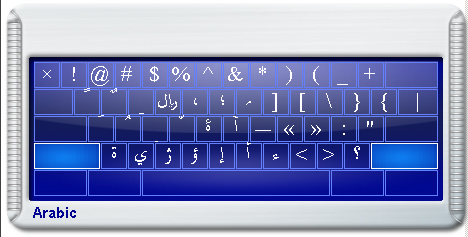
A mouse click on one of these three keys locks the key down so that the mouse can be used to select another key. The Caps Lock key is used to lock whatever combination of shift keys is currently selected. Pressing Caps Lock again will unlock the shift keys.
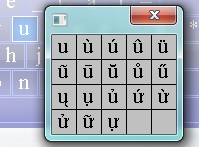 Right clicking on a key of the virtual keyboard will display a window with the character variants. The student can select the appropriate variant by clicking on it.
Students cannot use the Phone function to call another student, nor can they directly initiate a phone conversation with the instructor; they can however send a request for assistance at any time during the lesson.
Sending a request for assistance can be done using any of the following:
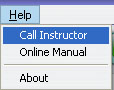
The instructor will receive the request and initiate the call to begin a conversation.
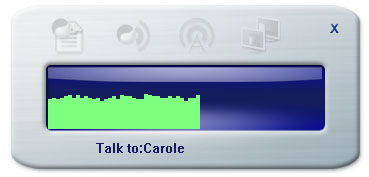 When the instructor initiates the call, the phone interface appears on the student’s screen:
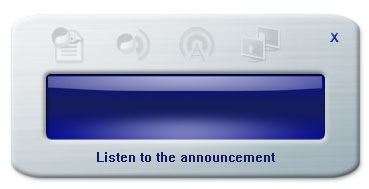
The instructor may also decide to make an announcement to all students simultaneously using the Phone, in which case the phone window appears on each student’s station, as illustrated below:
Note:
The instruction says : Listen to the announcement.
There is no volume graph shown as the students cannot record their voice
Students cannot end the announcement nor exit the window. It will disappear on it’s own as soon as the instructor stops the announcement.
The phone window however can be moved around the screen if its location prevents an item from showing.
Sometimes, the instructor when correcting an item will want to leave some feedback to the student. It might be a general comment on the recording done, or a request for the exercise to be redone.
When a message is left in an exercise by the instructor, the student is brought directly to that exercise when entering the
lesson. The message will play automatically as soon as the exercise interface is displayed.
The instructor has the option, when leaving a message to the student, to force the student to re-do the item by preventing the student from proceeding to another item. If the student attempts to proceed to the next item by clicking the NEXT button, the following message will appear in the item bar.

 The system has the capability to impose time limits on questions or parts of lessons.
In some cases, the lesson or test may be totally automated, so that not only the time spent per item is limited, but also the CAN-8 functions, like listening or recording or even moving to the next item will start at a defined time without student interaction.
Within an item, time limits can be set on either or both the presentation of the question and the recording of the student's
answer. When timing applies, a timer appears either on the Item's bar (preparation timer) or on the recording graph (recording timer) and counts down.

The first timer activated when the item is entered is the Preparation (Time) clock.
Presentation time allows the student time to read text, listen to the recorded sound, or think of the answer. It is located on the item bar.
When the presentation time limit is up, the student recording automatically begins if the item requires an audio answer. For dictation, multiple choice or fill-in items
the item is terminated as if the Next key had been pressed.
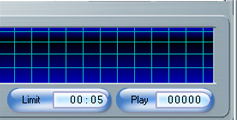 The recording timer, or Limit timer, is located in the student audio graph.
This timer shows and counts down the maximum time allowed for this recording. It is therefore found only in items where recorded answers are required.
When this counter reaches 0:00,
the item is terminated as if the Next key had been pressed.
NOTE:
Some items with timers are totally automated and all buttons in the student's interface are deactivated. The voice recording starts as soon as the time counter reaches 0:00 and finishes when the Limit counter reaches 0:00.
In other cases, items with timers are partially automated. Either one, or both of the timers might be present, but some of the function buttons, like Record or next are active.
The Timers' behaviour is different depending on the type of item it is placed in. Further details related to item specific timers can be found in the Item description section.
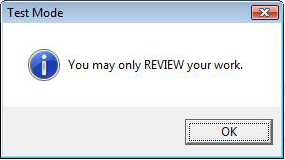
The information displayed to the student varies depending on which mode the lesson was set to by the instructor.
The lesson can be set in :

NOTE:
The student should not attempt to exit this window or the lesson. As soon as the instructor changes the lesson mode to “take test”, the message box will disappear and the test will start.
If the student does exit the window, when the instructor starts the test the student might be prevented from taking it.
 In the examples shown, the student can select the next item from a menu.
Note:
when the lesson item selection has been set to sequential or random, the student is presented with the first item in the lesson and proceeds directly to the next item when each item is finished.
With these settings, the tree view is hidden and the Back button disabled. The students have to take the test in the order given.
Available marks are not shown either.
If the student exits a test set in sequence mode, re-entering it will bring the student back to the next un-answered item. It will not give the option to redo items for which an answer had previously been recorded.
 If such is the case, all buttons are disabled; the student will be brought from item to item without possible interaction with the system. The recording will start automatically, and the student will be prevented from either going forward, backwards or listen to instructions a second time.
Note:
When re-entering this test, the student is presented with the first NON ANSWERED item.
Answers previously recorded cannot be re-recorded.